~Welcome to My Homework Pages~

 Intro to
Cascading Style Sheets
page
1 of 5
>
Lesson3:
Boxes and Borders
In the last lesson I said that as far as CSS is concerned,
every HTML element is considered a box, and as such, a box has
certain properties regardless of what element it might
actually be.
A CSS box has a width and height, as you would expect, but
it also has border, margin and padding properties.
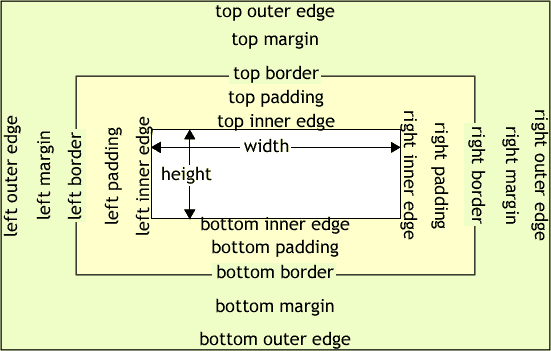
The different parts of the box model are shown in the
diagram below.

The width of an element without any padding, border, or
margins is represented by the inner rectangle. As soon as you
add a border, padding, or margins, then the width and height
of the element increases.
You have full control over all parts of the box. You can
set a padding, margin, or border on any or all of the sides.
Since we are all used to using tables, think of the padding
as the same as cellpadding, border is of course a border, and
margin somewhat similar to vspace and hspace attributes for an
img tag.
With CSS, you will find yourself using margins and padding,
either one or the other, or both together depending on what
you are doing. For instance, these pages use a margin-left and
margin-right on a content <div> to add space on both sides of
this text.
Looking at the box model above you might think that padding
and margins do the same thing, add space around the central
box, but that is not correct. The padding pushes any borders
you have declared away from the central box, and any
background you have on the box will expand with the padding,
but will not be behind the area occupied by the margins.
To illustrate, here are 4 paragraphs, with a background and
border. The first paragraph has no margin or padding, the
second paragraph has padding and no margin, the third
paragraph has only a margin, while the 4th paragraph has both
padding and margin.
Hello, I'm a paragraph sitting on the page
to show you some padding and margin differences. I have a
border and a background with no padding or margins.
Hello, I'm a paragraph sitting on the page
to show you some padding and margin differences. I have a
border and a background with no margin but a padding of 10
pixels.
Hello, I'm a paragraph sitting on the page
to show you some padding and margin differences. I have a
border and a background with no padding but a margin of 10
pixels.
Hello, I'm a paragraph sitting on the page
to show you some padding and margin differences. I have a
border and a background with padding of 10 pixels and a margin
of 10 pixels.
You may notice something with the paragraphs above with no
margins - there is no space between them while normal
paragraphs on a web page have a gap between them. This is
because the browser puts a default top and bottom margin on a
<p> element of approximately 1em, equal to one blank line.
Notice something else, the first paragraph with a margin of
10px has a 10px gap between it and the paragraph above that
has no margin, but the gap between it and the paragraph below
that also has a margin of 10px still only has a 10px gap, not
the 20px gap you might expect.
This is a feature of CSS margins, in that the rules specify
that adjacent vertical margins collapse to the size of the
largest margin, and do not add together. This is why
paragraphs have only 1 blank line between them even though
they have a default top and bottom margin of 1em, the margins
collapse together, leaving only the one space.
A lot to remember. Maybe, but after using margins and
padding for a while you will soon become familiar with which
to use, and where. It is only by using these features and
learning by your mistakes that you will become comfortable
with the new world opened up by CSS.
We will now have a look at borders.
page
1 of 5 >
~ Learning Can be Fun ~

|


![]() HOME
CSS
INTRO
LESSON 1
LESSON 2
LESSON 3
HOME
CSS
INTRO
LESSON 1
LESSON 2
LESSON 3